Dividing Perennials in Fall
After a wonderful summer with lots of heat, I find my perennial beds are starting to look as if they are bursting at the seams in places. Fall is a great time to get back out into the garden and start evaluating your perennial beds. For many perennials, now is a good time for dividing perennials and moving others around if you’ve found they aren’t in the right spot for you. Most gardeners start the season in the early spring by dividing perennials and adding new ones, but if you missed the opportunity at the beginning of the season to do this, you could still get some work done now so that next spring you can relax a little.
Common Plants That May Require Division
Division becomes necessary for numerous plant varieties. Among the most common ones are:
- Anemones
- Asters
- Astilbe
- Bearded Iris
- Bee Balm
- Black Eyed Susans
- Brunnera
- Chrysanthemums
- Cone Flowers
- Creeping Phlox
- Daylilies
- Garden Phlox
- Hardy Geraniums
- Hostas
- Lambs Ears
- Ornamental Grasses
- Peonies
- Sedums
Dividing Perennials: Timing is Everything, Maybe
As a rule of thumb, spring and early summer flowering perennials are said to be best moved and divided in the fall, and any later summer through fall bloomers should be divided in the spring. However, this is a rule that can generally be broken as long as when you are dividing perennials, you are keeping them well-watered in their new homes. The best time to attack dividing perennials is when the foliage has started to yellow off after the first couple of frosts. At this point, your perennials will be heading into dormancy, so they won’t even know what you’ve done ‘til next spring when they wake up again!
Dividing Perennials: Let’s Dig In
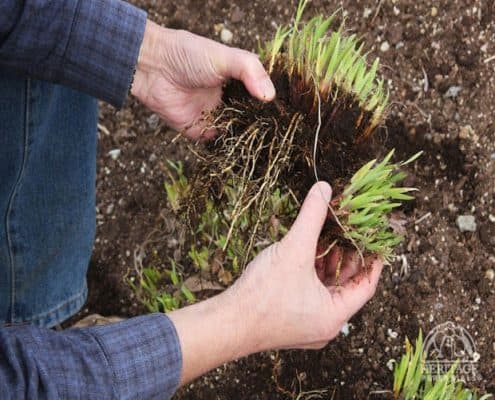
To start dividing perennials, you will need first to cut back most of the foliage to make your job easier. Start by inserting your shovel into the ground around the outside edge of the plant growth. This area is referred to as the ‘drip line’ of the plant. Work your way around the drip line of the plant, inserting your shovel into the ground deeply all the way around to loosen up the patch and make lifting it easier. Once you have done this, lift the patch out with the shovel and start to shake off all the excess soil around the roots.
When you have the clump out of the ground, you will first want to make sure all the roots are healthy and firm. If any pieces of the roots are soft and squishy, cut these out and discard them. Once you have only healthy roots and plants left, you can start to divide them. Don’t worry; it’s not a delicate job where you have to be very exact.
Divide and Conquer your Perennials
The best way to divide large, heavy clumps of perennials, such as daylilies, hostas and coneflowers, is to take 2 large garden forks, insert them into the centre of the clump and start pulling them in opposite directions. Don’t have a couple of garden forks? No worries, just use a sharp spade or knife to cut through the clump. Some perennials will require a little more effort than others to divide, so don’t worry about ripping the roots. When dividing perennial peonies, you want to make sure that each section has at least one eye in it. The eye is the little bit of growth visible just below the soil line when dug out. With peonies, you can either pry pieces away or take a sharp, clean knife and cut sections. Make sure that all pieces are healthy and firm with no rotten roots attached. If there are any rotten or mushy pieces, cut these away and discard them in your compost or garbage.
With perennials, you can divide a mature clump into many pieces without worrying about hurting the plant. Make sure that each piece is a good size, though, so that you aren’t re-planting very small clumps. Small clumps may take a few seasons to fill in again and may look small and sad for the next season or so. If you are dividing irises, you can divide them into small pieces, but when replanting, group a few smaller pieces together for a good show over the next season while they fill in again.
Replanting after Dividing Perennials
Replant all perennials at the same depth as they were before the division, ensuring all the roots are covered in soil. Add some compost or manure to the soil before replanting to help rejuvenate older soil. Once all clumps have been re-planted, give them a good deep watering to settle the soil around the roots. Give your newly planted perennials a little Parkwood Transplanter fertilizer or a small handful of bone meal to encourage faster root development. As a final step, a layer of mulch is a good idea in any garden, especially when perennials have been divided and moved. It provides much-needed moisture around the roots and also extra insulation for the winter. A layer 2-3” deep is ideal. When placing mulch around perennials, make sure you keep the mulch away from the crown of the plant.
Sharing and trading are one of the great fun things. If you don’t want to re-plant all the pieces of perennials that you divided, consider giving some away to friends and family.