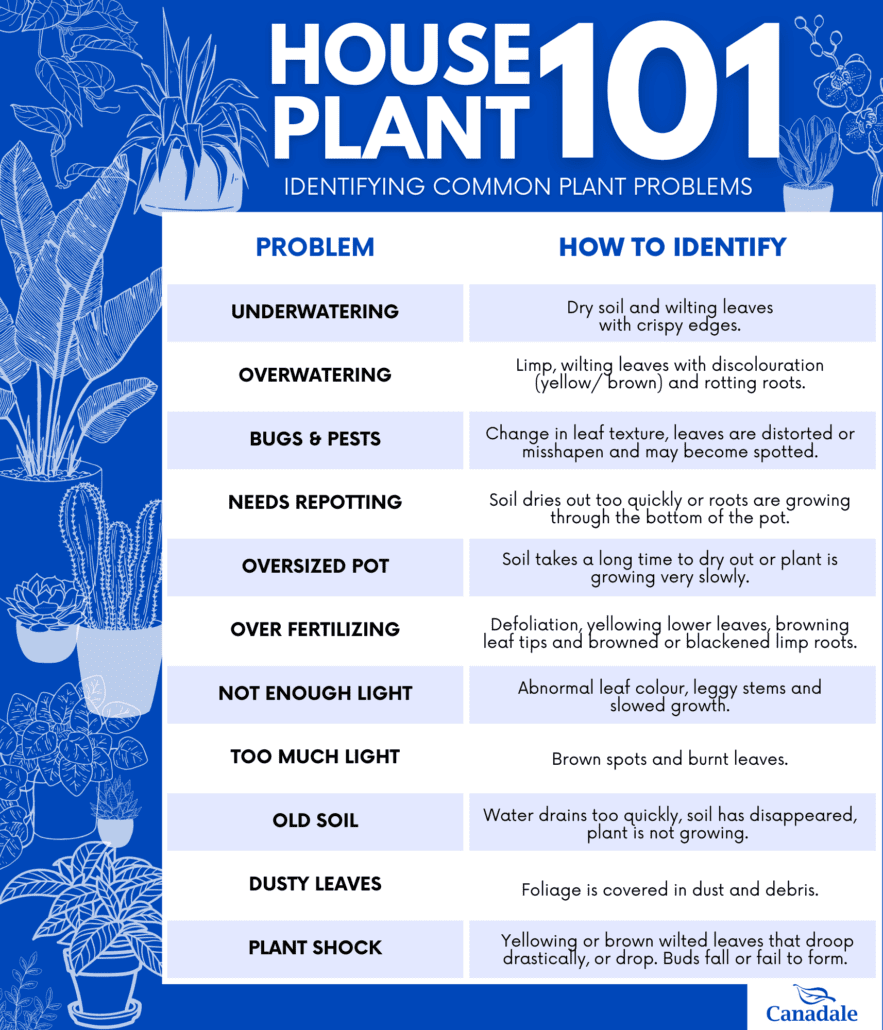
Houseplant 101: Identifying Common Problems
Plants play an important role in our lives and in our homes, but unfortunately, they are susceptible to a variety of problems that can cause them to become unhealthy or even die. From wilting leaves to discoloration, it can be difficult to identify the source of the problem. However, with the right tools and knowledge, it is possible to diagnose and treat common plant problems before they become too severe. In this article, we will explore some of the most common plant problems and provide you with practical tips and advice on how to keep your plants healthy and thriving.
Houseplant 101
We’ve all been there. We spend countless hours researching, choosing the right houseplant and buying it, bringing it home and caring for it, but it still dies!
No, it doesn’t make you a bad plant parent, and no, it doesn’t mean you have a black thumb. It means you need more information to help you out when you try again.
Check out these tips to help your Green Thumb grow:
WATER
Sometimes it can be hard to know how much water your plant needs. Every single plant has its own individual water needs. The best way to check if your plant needs watering is to feel the soil. And not just the top layer. Check at least a fingernail depth into the pot (up to the first knuckle for larger pots) and see how that underlayer of soil feels. Generally, if it’s moist, you can leave your plant for more time. If it’s dry, there’s a good chance your plant is thirsty (cacti and succulents excluded). So give your houseplant a thorough watering, let it drain, and then repeat! How often you water will depend on many factors, including plant variety, humidity and room temperature, potting mix used, season, pot/plant size, and more. Because there are so many considerations, observing the soil is the best guide for knowing when to water. Check for watering daily in the spring and summer and weekly in the winter, as plants need less water in their resting season.
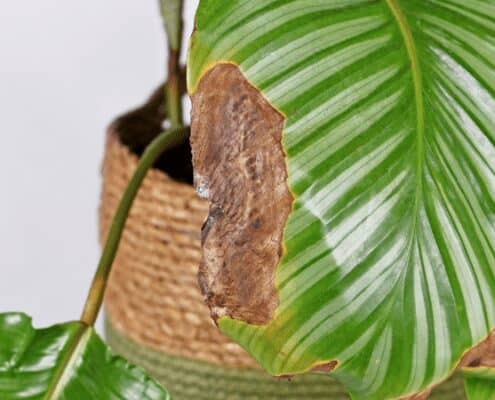
Suppose you see your plant begin to present dry soil, limp, wilting leaves (perhaps with crispy edges), or flowers that fade and fall off quickly. In that case, chances are your plant is not getting enough water. But don’t panic! Your plant might need a day (or few minutes) at the ‘Plant Spa.’ Take your plant to the sink (or bathtub) and submerge the whole pot in water. Leave it there to soak for 10-15 minutes. Like any spa treatment we enjoy, this soaking should revive your thirsty houseplant. Please let your pot drain before returning it to its spot.
On the opposite spectrum, you can overwater. We usually see this when we underwater, then try to compensate by giving too much water – a kill-it-with-kindness situation. The most common sign of overwatering is wet soil, mouldy flowers, discoloured leaves, and mushy rotting roots that can look slimy. When we overwater, plants can feel like they are drowning. Roots need air, as well as water, to live. But don’t worry. You can rescue your houseplant by repotting it. First, you must cut out all the yucky rotted roots you can see. Next, remove your plant from its current pot and get rid of as much old wet soil as possible. Spray the leftover roots with a fungicide, then repot them with fresh potting soil.
If you need to improve at remembering to check your plant for water, or if, like many of us, you don’t feel confident when deciding if it’s time for your plant to have a drink, consider getting yourself a hydrometer. It can take the guesswork out of watering by monitoring your soil moisture level and telling you exactly when the soil is too dry (and your plants are thirsty!).
Pro-Tip: Several houseplants prefer keeping their leaves dry – meaning it’s best to water from under the leaves directly onto the soil. If you’re unsure if your plant has this preference, ask us!
PESTS
No matter how hard we try, sometimes our houseplants get bugs. It doesn’t mean your plant is sick or dirty. The most common cause of houseplant pests is bringing them inside from any outdoor environment. Some of the most common houseplant pests we see are aphids, spider mites, mealy bugs and fungus gnats. Along with seeing the bugs, other signs that you might have a pest problem are changes in the leaf texture, the leaves becoming distorted or misshapen, or sometimes leaves becoming spotted.
When you see, or suspect bugs, the most important thing to do is to treat your plant immediately. A few bugs usually don’t cause any real damage. The problem comes when you wait and end up with an infestation. An infestation can cause damage and can quickly spread between all your houseplants. So once you believe you have a bug problem, inspect all your plants to check for bugs and isolate any that are affected.
Treatment for insects is usually as simple as spraying the entire plant with insecticidal soap. On occasion, you may need to spray a couple of times, letting the spray dry in between applications.
Pro-Tip: When you bring houseplants indoors after being outside, treat them immediately for bugs. Spray the whole plant (tops and bottoms of leaves, stems, etc.) with insecticidal soap. Then treat the soil for any sneaky pests hiding (or sleeping dormant) in there with a solution of ¼ insecticidal soap and ¾ water. Keep the plants isolated until they have completed treatment.
REPOTTING/CHANGING SOIL
How do you know when it’s time to repot your houseplant? It’s a tricky question because if you go too big too soon, an oversized pot can cause problems, too, like wet soil and lack of growth. Plants usually prefer to feel snug and cozy in their pots.
When you’re watering, this is the best time to check if your plant is ready to be repotted. If the soil in your pot is drying out sooner than usual, it may be time to think about repotting. The biggest clue, however, is seeing roots growing through the pot’s bottom (or sometimes top or sides). That is your obvious sign that it’s time to repot.
Usually, the best time to repot houseplants is in the spring, so the roots will have lots of time to get established in their new pot before winter. When selecting a new pot, look for one a little bigger than the current one and make sure it has good drainage. When you remove the houseplant from its current pot, carefully tease out some of the entangled roots on the outside. Cut out any rotted or slimy roots. But overall, disturb the roots as little as possible. Place the plant on a layer of potting mix in the bottom of the new pot and then gradually fill around the root ball. Firm the potting soil down, adding more until it’s about level with the base of the houseplant. Then water thoroughly, making sure it is draining well.
If you notice your soil is drying too quickly, your plant isn’t growing, but no roots are growing out of the pot, you may have old potting soil. If this is the case, you might also notice that some soil has disappeared from the pot. To replace old soil, carefully remove the houseplant from its current pot. Scrub out the pot if you plan to reuse it. Remove as much soil around the root ball as possible without disrupting the roots. Cover the bottom of the pot with a layer of fresh potting mix. Place the plant on top, add fresh soil, and gradually fill around the root ball.
Pro-Tip: Sometimes it’s not possible to repot really big houseplants. It would disturb them too much and cause more harm than good. In these cases, you can top-dress the pots. In spring, carefully remove the top inch (or 2 for really big pots) of potting mix from the pot and replace it with fresh potting mix. Tamp it down, leaving it level with the base of the houseplant.
FERTILIZER
Fertilizers can be a great tool to help our plants stay healthy. Our houseplants live in the same pot and the same soil for extended periods, using up the nutrients in that soil. Fertilizers replenish nutrients so our houseplants can flourish. Most of the time, it’s an excellent way to give our houseplants a boost.
The type of fertilizer you use will ultimately depend on the type of houseplant you have. Some houseplants, like orchids, benefit from fertilizers with unique formulas. Others are happy with an all-purpose. If you have questions about which fertilizer is suitable for your plant baby, stop in, and we will be glad to show you the best options.
The most common issue we see with feeding our houseplants is over-fertilizing. If the lower leaves on your plant turn yellow or develop brown leaf tips and brown or black limp roots, or if your plant is losing leaves altogether. You may be over-fertilizing. If this is the case, you can leach the soil by giving the pot excessively long water to try and rinse out the fertilizer. Try this a couple of times to wash out any fertilizer. Ensure you have good drainage and that the plant isn’t sitting in any water. After good leaching, let the soil dry out completely before watering it again. Only start fertilizing again once you’ve seen some healthy growth begin in your houseplant.
Pro-Tip: Most houseplants need less fertilizer in the winter. Be most cautious of over-fertilizing during this time.
LIGHT
It’s important to remember that each variety of houseplant has its likes and dislikes, including how much light exposure and the intensity of that light. One plant’s light conditions could kill another, so it’s imperative to learn about a plant’s required light conditions BEFORE buying it! Of course, sometimes this isn’t possible – who doesn’t love a plant gift?! – so here are some warning signs to look out for to ensure your houseplant is getting its proper dose of sunshine.
If you notice your plant’s stems are getting leggy, the leaves are turning an abnormal colour, and your plant isn’t showing much growth, it may not be getting enough sunlight. In that case, move it to a sunny spot closer to a bright window (south facing if you can).
Alternately, suppose your plant has brown spots and burnt leaves (think sunburn). In that case, it’s probably getting too much light – especially direct sunlight. Move it to an area where it’s still very bright but not always in direct sunlight. Even the most devoted sun-worshippers need a break from time to time. Make sure your plant is well watered and remove any damaged leaves.
Pro-Tip: Matching a houseplant to its favoured light requirements is a HUGE key to success. Remember, we have many great suggestions for all light conditions, even that super low-light corner in the bathroom! When in doubt, talk to a garden centre attendant to ensure your growing conditions at home will be appropriate for the plant you are considering.
DUST
This one is a pretty easy problem to solve. You see your houseplant leaves covered in dust, so dust them! Yes, it looks nicer, but did you know that keeping your foliage clean helps your plant breathe? Dust can block leaf pores, so your plant can’t breathe properly. It also forms a screen on the leaf, preventing sunlight from being absorbed. Regular dusting with a damp cloth keeps your houseplants looking their best and staying their healthiest. Just like pets need grooming, so do plants!
Pro-Tip: You can buy leaf cleaner tools (they look like tongs). They’re handy and easy to use, although a damp cloth works just as well!
SHOCK
Sometimes plants can have a difficult time adapting to new environments or conditions. When this occurs, they can experience something called plant shock. Shock mainly occurs when something in the plant’s world has changed. You brought your houseplant indoors for the winter or repotted it into a pretty new pot. After making a change like this, you may notice your plant develops yellow or brown wilted leaves that droop heavily or even drop off altogether. Buds may fall off or fail to form entirely. These are telltale signs that your plant is going through shock.
The most important thing to remember in this situation is to be patient – your plant needs time to adapt and recuperate. Just because it’s struggling to get used to something new doesn’t mean it won’t recover fully. Keep the plant well-watered and make sure it has adequate drainage. Please keep it in the light conditions it prefers and refrain from moving it to a new environment. Continue to care for it as you usually would, and it should recover on its own after a few days.
Pro-Tip: New plants get homesick, even when you’re doing everything right! It will take time for your new houseplant to get accustomed to its new home after leaving the greenhouse. Don’t take it personally, and be patient.
TEMPERATURE
Most houseplants have their natural home in a tropical location (lucky!). It’s no surprise that they need to come inside our homes for the year’s cold months. Too cold is a killer for our houseplants, but too hot can also be a big problem. Most houseplants have an ideal temperature range between 55 to 75 degrees F (about 13 to 24 degrees C).
If you’re too warm in a room, chances are your houseplants are too. Too hot the temperature, you may see unnaturally short-lived flowers and spindly growth. Leaves may wilt, the edges turn brown or develop sunburn, or the leaves may fall off. If the temperature is too cold, you will see the leaves curl, followed by browning and falling off. In addition, rapid temperature changes can cause houseplants a lot of stress. This kind of stress can present as rapid yellowing of the leaves, followed by leaf fall. If you notice any of these symptoms, immediately move your plant to another location with a more appropriate temperature, but be careful to make the temperature change as gradual as possible.
Pro-Tip: A good rule of thumb for houseplants is that they need a constant and modest temperature during the growing season (spring/summer) and a lower temperature during their resting season (fall/winter). And generally, a little too cool is better than a little too hot.
AIR HUMIDITY & DRAUGHTS
The ideal humidity level for most houseplants is about 50% air humidity – the equivalent of a summer day in temperate regions. When we bring our houseplants indoors and turn on the heat to keep us warm, the moisture in the air significantly decreases. Too little humidity, which means too much dry air, can lead to leaf tips turning brown and shrivelled, leaf edges turning yellow and wilting, flowers and buds shrivelling and falling off, or even leaves falling off if the plant is susceptible to dry air.
There are simple things we can do to combat excessively dry air. Kitchens and bathrooms naturally have more moisture in the air. Keep lots of houseplants in these rooms. That doesn’t mean you can’t have plants in your living room, even if the air is dryer. Keeping an air humidifier in a dry room is an easy and effective fix. You can also regularly use a mister to give your houseplants the necessary moisture. Just make sure to mist the entire plant.
Displaying houseplants in groups can also help with humidity. Grouping them gives houseplants the benefit of moisture from moist soil and foliage and keeping the air between them naturally higher in humidity. But ensure they are not too close together (not touching) as too much air humidity can cause problems.
Airflow is very important when humidity is high. Too much moisture can cause mould to grow on leaves and flowers. It can also lead to patches of rot on leaves and stems.
Pro-Tip: Papery leaves usually need more humidity than thick leathery ones. Keep that in mind if your home runs on the dry side.
Draughts: Houseplants do not like draughts (air currents moving quickly across the plant). Suppose you notice your plant in a draughty position or see your plant starting to develop brown or burnt-looking leaves that are wilting or drooping. In that case, it’s a good idea to move the plant to a spot out of the path of a draught. Move them immediately, remove damaged leaves, and be patient as they take time to recover.
~~~~~~~~~~~~~~~
And when in doubt, remember our friendly and knowledgeable garden centre attendants are here for you. Visit us, email us, or give us a call, and we’d be happy to help with care tips, helpful suggestions and garden support so you can always experience gardening success!